HEC Worldwide's Operating Instructions for Big Kahuna
The Big Kahuna is used as a water slide
- Ride requires one operator located at the entrance of stairway controlling access to the ride. The operator shall also verbally control riders on the slide from that position. The operator has the full vision range to control entry & exit.
- Riders will climb up the slide's walk way utilizing either set of handrails that go up the entire length of the walk way.
- Once on top of the slide riders will go to right. When it is your turn to slide, sit down with your feet in front of you, and slide down the slide feet first with your arms crossed. This slide can hold up to 3 riders, do not allow anymore than 3 riders on the slide at a time, wait until the slide landing area is clear before allowing another rider to enter the slide or slide down the slide. Instruct riders to exit the slide landing area quickly after sliding. Do not allow riders to bounce on the slide landing area.
- Make sure the landing pad is cleared before the next rider slides down.
- Only one rider is allowed on the slide surface at a time. Double riding is strictly forbidden.
- Riders on slide shall only slide feet first. Sliding head-first is prohibited. On no account allow any rider to jump or dive onto the slide.
- Do not allow riders to try and exit the slide over the side, make sure thy exit off the front of the slide. Do not allow riders to try and walk back up the slide surface.
- The following evacuation instructions should be followed in case of power failure:
- Stop riders from entering the slide, including parents.
- Riders shall be told to leave back down the walkway if they are on the lower part of the walkway, or slide down if they are up top. There is plenty of time so riders should not be rushed, especially on the slide.
- Apply the normal slide rule of one person on each slide at any time.
- It takes close to two minutes before the slide starts to sag noticeably, and even then a rider may safely slide down and exit. Evacuation of this device should take no more than 30-45 seconds.
- Do not allow anyone to enter the ride until it is properly re-inflated and the power supply is stabilized.
- Place the fan on the opposite side of the water source for the hose. Make sure the fan area stays dry.
Important Information
- Waiting riders should stand at least 3ft (1m) from the entrance of the ride.
- Running to enter the ride is not permitted.
- Enter the ride head first is only allowed from a standing position.
- One rider per ride entry location is allowed to enter the ride at a time.
- Do not allow the riders to stand up and run off the ride.
- Do not allow somersaults or back flips anywhere on the ride.
- Do not wear shoes on the ride. Remove any hard or sharp objects such as pens, buckles, jewelry, hair clips, etc. Glasses are best removed also.
- No gum or wearing face paint allowed.
- Do not allow riders to deliberately collide with one another.
- At least one adult operator shall be on duty at all times the ride is being used.
- Please refer to the safety label on the ride for the minimum Height and Max weight requirements.
- Make sure there always be same age group or height group play the unit at one time, mix up group is dangerous.
- If the power fails, assist the riders off the unit immediately and do not allow them to re-enter until power is restored and the ride is fully inflated again
Maintenance and Inspection
- The unit can be easily cleaned with a cloth or light brush. Use a vinyl cleaner and rinse thoroughly to remove detergent before storing.
- Do not pack the unit when wet. If this is unavoidable lay the unit out to dry at the earliest opportunity.
- The unit should be inspected regularly for damage . If there is evidence of tearing at the anchor points or vinyl panels, the unit should not be used until the repair has been completed.
Repairs
To repair small tears up to 12", use the "Single Patch Method "as follows:- Cut an oval or round vinyl patch approximately 4" larger than the cut.
- Clean the area around the tear using rubbing alcohol.
- Apply HH-66vinyl glue on the patch and on the surface of the inflatable.
- Allow the manufactures recommended drying time before applying the patch to the inflatable as indicated on the label on the container.
- Place the patch covering the cut area and apply pressure for 1 minute. Refer to the glue manufactures label for the recommended time for glue to dry once the patch is applied.
- If the "Single Patch Method" is not a viable option use Tear Aid for a temporary repair until you can apply the "Single Patch Method" or send the unit to a repair facility.
Daily Checklist
- Ensure maximum winds are less than the manufactures recommended wind speed requirement for unit.
- Ensure temperatures are greater than 40 F.
- Ensure Blower is hook to a GFCI ( Ground Fault Circuit Interrupter).
- Ensure there are no obstructions in the blowers and their inflation tubes.
- Ensure unit is properly Inflated.
- Ensure all tether points are secure. Ensure all deflation zippers and flaps are closed.
- Walk around the unit and inspect seams and search for wear damage.
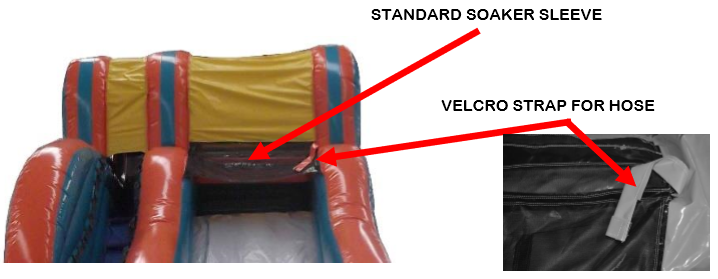
Water hose installation
- Soaker Sleeve is attached to netting above slide lane and is provided by manufacture.
- Water is supplied for this ride from a standard garden hose, the garden hose is slid into the soaker sleeve attached to the netting and secured by a Velcro Strap.
| Inflated Dimensions | 35'L x 14'W x 17'H |
| Utility Safety Zone | 20' Clearance |
| Unobstructed Zone | 5' Clearance |
| Game Weight | 491 lbs. |
| Blower | 1-1.0 high output or 1-1.5 HP (min.500CFM) (min. 4.5” WG) |
| Wind Speed Operation | 15 mph MAX |
| Tie Down Rings | 7 |
| Tie Down Ropes | 4 |
| Max Players | 3 |
| Max Player Height | N/A |
| Min Player Height | 34" |
| Max Player Weight | 200 lbs |
| Operators Required | 1 |
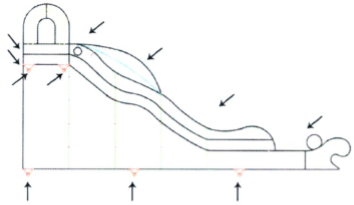
Each arrow represents an anchor point location. 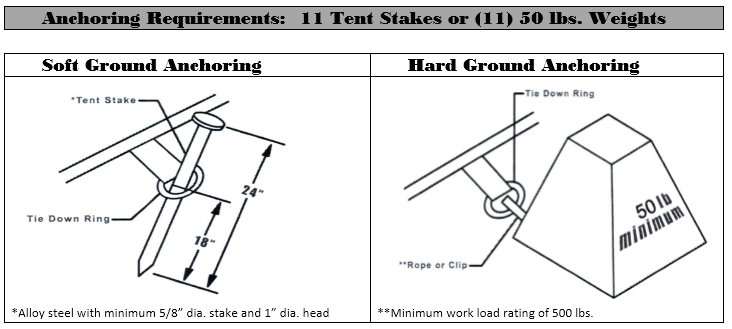 NOTE: Anchoring weights and stakes are intended to keep inflatable from shifting during normal operation. They are not intended to anchor inflatable during high winds. DO NOT operate inflatable in winds above 15 mph. If winds exceed 15 mph during operation, evacuate anad delate immediately.
© United Inflatable Rides. All rights reserved.
Powered by EventRentalSystems